HTML [CSS] input checkbox / radio 이미지 적용
페이지 정보


첨부파일
-
radio_design.psd (100.2K)
9회 다운로드 | DATE : 2019-09-19 15:06:29
본문
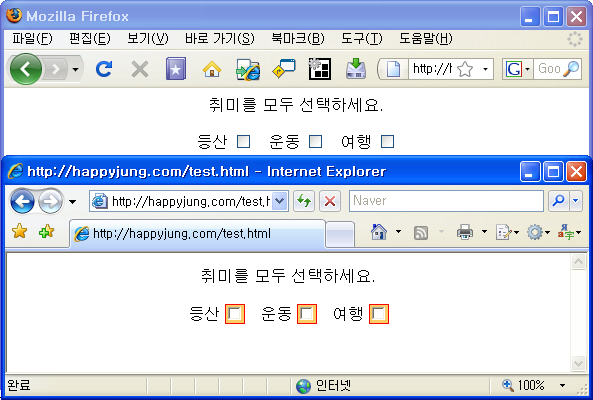
check box (체크 박스)에 디자인을 입히는 방법입니다.
1. check box(체크 박스)에 색상 보이기
<html>
<head>
<style type="text/css">
<!--
.format{
border-color:#FF0000;
border-style:solid;
border-width:1px;
background-color:#FFCC66;
}
-->
</STYLE>
</head>
<body>
<center>
<form>
취미를 모두 선택하세요. <br /><br />
등산 <input name="hobby" type="checkbox" value="등산" class="format">
운동 <input name="hobby" type="checkbox" value="운동" class="format">
여행 <input name="hobby" type="checkbox" value="여행" class="format">
</form>
</center>
</body>
</html>
2. CSS 활용한 이미지로 변경하기


샘플 : https://www.happyjung.com/demo/css/checkbox.html
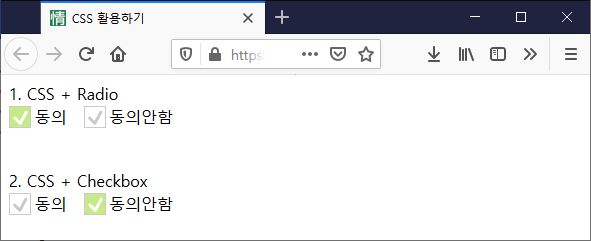
2-1. CSS + Radio
<style>
.radio-container { position: relative; }
.radio-container input[type="radio"]{
width:1px;
height:1px;
padding:0;
border:0 none;
margin:0;
position:absolute;
left:0;
top:0;
overflow:hidden;
clip:rect(0 0 0 0);
}
.radio-container label{
height:22px;
line-height:22px;
padding-left:20px;
display:inline-block;
background:url(https://happyjung.diskn.com/data/lecture/icon_radio1.png) no-repeat 0 0;
vertical-align:middle;
cursor:pointer;
}
.radio-container input[type="radio"]:checked + label{ background-position: 0 -22px; }
</style>
<div class="radio-container">
<input type="radio" name="agree1" id="radio_agree1" value="1"> <label for="radio_agree1"> 동의</label>
<input type="radio" name="agree1" id="radio_agree2" value="2"> <label for="radio_agree2"> 동의안함</label>
</div>
2-2. CSS + Checkbox
<style>
.checkbox-container { position: relative; }
.checkbox-container input[type="checkbox"]{
width:1px;
height:1px;
padding:0;
border:0 none;
margin:0;
position:absolute;
left:0;
top:0;
overflow:hidden;
clip:rect(0 0 0 0);
}
.checkbox-container label{
height:22px;
line-height:22px;
padding-left:20px;
display:inline-block;
background:url(https://happyjung.diskn.com/data/lecture/icon_radio1.png) no-repeat 0 0;
vertical-align:middle;
cursor:pointer;
}
.checkbox-container input[type="checkbox"]:checked + label{ background-position: 0 -22px; }
</style>
<div class="checkbox-container">
<input type="checkbox" name="agree1" id="checkbox_agree1" value="1"> <label for="checkbox_agree1"> 동의</label>
<input type="checkbox" name="agree2" id="checkbox_agree2" value="2"> <label for="checkbox_agree2"> 동의안함</label>
</div>
참고자료
https://ithub.tistory.com/229
https://codepen.io/hcs1105/pen/GxsDH
1. check box(체크 박스)에 색상 보이기
<html>
<head>
<style type="text/css">
<!--
.format{
border-color:#FF0000;
border-style:solid;
border-width:1px;
background-color:#FFCC66;
}
-->
</STYLE>
</head>
<body>
<center>
<form>
취미를 모두 선택하세요. <br /><br />
등산 <input name="hobby" type="checkbox" value="등산" class="format">
운동 <input name="hobby" type="checkbox" value="운동" class="format">
여행 <input name="hobby" type="checkbox" value="여행" class="format">
</form>
</center>
</body>
</html>
2. CSS 활용한 이미지로 변경하기
샘플 : https://www.happyjung.com/demo/css/checkbox.html
2-1. CSS + Radio
<style>
.radio-container { position: relative; }
.radio-container input[type="radio"]{
width:1px;
height:1px;
padding:0;
border:0 none;
margin:0;
position:absolute;
left:0;
top:0;
overflow:hidden;
clip:rect(0 0 0 0);
}
.radio-container label{
height:22px;
line-height:22px;
padding-left:20px;
display:inline-block;
background:url(https://happyjung.diskn.com/data/lecture/icon_radio1.png) no-repeat 0 0;
vertical-align:middle;
cursor:pointer;
}
.radio-container input[type="radio"]:checked + label{ background-position: 0 -22px; }
</style>
<div class="radio-container">
<input type="radio" name="agree1" id="radio_agree1" value="1"> <label for="radio_agree1"> 동의</label>
<input type="radio" name="agree1" id="radio_agree2" value="2"> <label for="radio_agree2"> 동의안함</label>
</div>
2-2. CSS + Checkbox
<style>
.checkbox-container { position: relative; }
.checkbox-container input[type="checkbox"]{
width:1px;
height:1px;
padding:0;
border:0 none;
margin:0;
position:absolute;
left:0;
top:0;
overflow:hidden;
clip:rect(0 0 0 0);
}
.checkbox-container label{
height:22px;
line-height:22px;
padding-left:20px;
display:inline-block;
background:url(https://happyjung.diskn.com/data/lecture/icon_radio1.png) no-repeat 0 0;
vertical-align:middle;
cursor:pointer;
}
.checkbox-container input[type="checkbox"]:checked + label{ background-position: 0 -22px; }
</style>
<div class="checkbox-container">
<input type="checkbox" name="agree1" id="checkbox_agree1" value="1"> <label for="checkbox_agree1"> 동의</label>
<input type="checkbox" name="agree2" id="checkbox_agree2" value="2"> <label for="checkbox_agree2"> 동의안함</label>
</div>
참고자료
https://ithub.tistory.com/229
https://codepen.io/hcs1105/pen/GxsDH
댓글목록
등록된 댓글이 없습니다.